使用全连接层操作
我们已经看到如何在 tensorflow 中用线性代数来定义全连接层。在本练习中,我们将跳过线性代数细节,交给 keras 来处理。这将使我们能够用比之前"1 个隐藏层、3 个特征"的网络更少的代码,构建下图这个具有 2 个隐藏层和 10 个特征的网络。
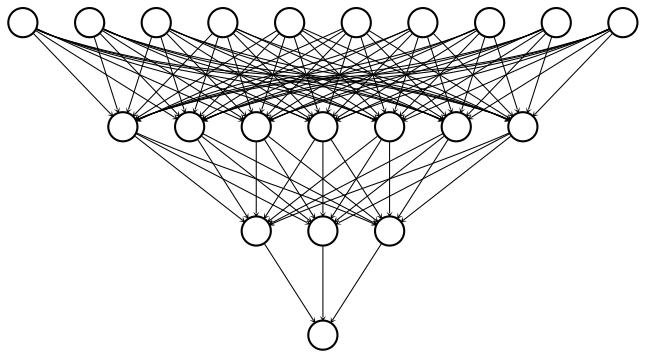
要构建该网络,我们需要定义 3 个全连接层。每一层都以前一层为输入,与权重相乘,并应用一个激活函数。请注意,输入数据已定义并可用,为一个 100x10 的张量:borrower_features。此外,keras.layers 模块已可用。
本练习是课程的一部分
Python 中的 TensorFlow 入门
练习说明
- 将
dense1设为具有 7 个输出节点且使用 sigmoid 激活函数的全连接层。 - 将
dense2定义为具有 3 个输出节点且使用 sigmoid 激活函数的全连接层。 - 将
predictions定义为具有 1 个输出节点且使用 sigmoid 激活函数的全连接层。 - 按顺序打印
dense1、dense2和predictions的形状,使用.shape方法。为什么这些张量都有 100 行?
交互式实操练习
通过完成这段示例代码来试试这个练习。
# Define the first dense layer
dense1 = keras.layers.Dense(____, activation='____')(borrower_features)

# Define a dense layer with 3 output nodes
dense2 = ____

# Define a dense layer with 1 output node
predictions = ____

# Print the shapes of dense1, dense2, and predictions
print('\n shape of dense1: ', dense1.shape)
print('\n shape of dense2: ', ____.shape)
print('\n shape of predictions: ', ____.shape)