가중치 변화가 정확도에 미치는 영향 코딩하기
이제 실제 네트워크의 가중치를 바꿔 보고 모델 정확도가 어떻게 달라지는지 확인해 보세요!
다음 신경망을 살펴보세요:
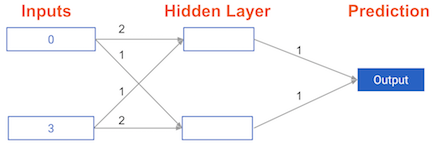
가중치는 weights_0로 미리 로드되어 있습니다. 이번 연습 문제에서의 목표는 weights_0의 가중치 중 하나만 업데이트해 weights_1을 만들고, 완벽한 예측(예측값이 target_actual: 3과 동일)을 얻는 것입니다.
필요하다면 펜과 종이를 사용해 다양한 조합을 실험해 보세요. 첫 번째 인자로 데이터 배열, 두 번째 인자로 가중치를 받는 predict_with_network() 함수를 사용합니다.
이 연습은 강의의 일부입니다
Python으로 시작하는 Deep Learning
연습 안내
weights_0에서 가중치 1개만 변경하여weights_1이라는 가중치 딕셔너리를 만드세요(완벽한 예측을 얻으려면weights_0에 단 1곳만 수정하면 됩니다).predict_with_network()함수에input_data와weights_1을 넣어 새 가중치로 예측을 구하세요.model_output_1에서target_actual을 빼서 새 가중치의 오류를 계산하세요.- 'Submit Answer'를 눌러 오류가 어떻게 비교되는지 확인해 보세요!
실습형 인터랙티브 연습
이 예제를 이 샘플 코드를 완성하여 풀어보세요.
# The data point you will make a prediction for
input_data = np.array([0, 3])

# Sample weights
weights_0 = {'node_0': [2, 1],
             'node_1': [1, 2],
             'output': [1, 1]
            }

# The actual target value, used to calculate the error
target_actual = 3

# Make prediction using original weights
model_output_0 = predict_with_network(input_data, weights_0)

# Calculate error: error_0
error_0 = model_output_0 - target_actual

# Create weights that cause the network to make perfect prediction (3): weights_1
weights_1 = {'node_0': [____, ____],
             'node_1': [____, ____],
             'output': [____, ____]
            }

# Make prediction using new weights: model_output_1
model_output_1 = ____

# Calculate error: error_1
error_1 = ____ - ____

# Print error_0 and error_1
print(error_0)
print(error_1)