用代码探索权重变化如何影响准确率
现在,您将亲自修改真实网络中的权重,并观察这如何影响模型的准确率!
看看下面的神经网络:
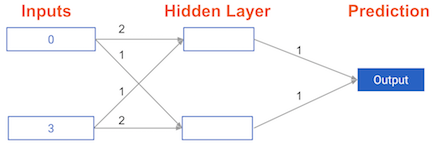
其权重已作为 weights_0 预先加载。您在本练习中的任务是仅更新 weights_0 中的一个权重,得到 weights_1,使其产生完美预测(预测值等于 target_actual:3)。
如有需要,可用纸笔尝试不同的组合。您将使用 predict_with_network() 函数,它以数据数组为第一个参数、以权重为第二个参数。
本练习是课程的一部分
Python 深度学习入门
练习说明
- 创建名为
weights_1的权重字典,其中将weights_0中的1个权重改动(只需对weights_0做 1 处修改即可得到完美预测)。 - 使用
predict_with_network()函数,传入input_data和weights_1,用新权重获取预测结果。 - 通过用
model_output_1减去target_actual来计算新权重的误差。 - 点击 "Submit Answer" 查看误差的对比!
交互式实操练习
通过完成这段示例代码来试试这个练习。
# The data point you will make a prediction for
input_data = np.array([0, 3])

# Sample weights
weights_0 = {'node_0': [2, 1],
             'node_1': [1, 2],
             'output': [1, 1]
            }

# The actual target value, used to calculate the error
target_actual = 3

# Make prediction using original weights
model_output_0 = predict_with_network(input_data, weights_0)

# Calculate error: error_0
error_0 = model_output_0 - target_actual

# Create weights that cause the network to make perfect prediction (3): weights_1
weights_1 = {'node_0': [____, ____],
             'node_1': [____, ____],
             'output': [____, ____]
            }

# Make prediction using new weights: model_output_1
model_output_1 = ____

# Calculate error: error_1
error_1 = ____ - ____

# Print error_0 and error_1
print(error_0)
print(error_1)